
Uniform Welding Seams While Saving Time!
The Duplo Welding Device
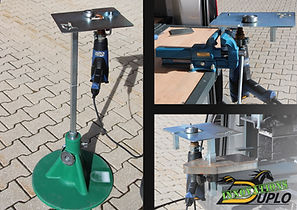
Wheteher on your hoof stand, anvil, or vise: our device helps you achieving uniform welding seams while saving time!
Currently, glueing on a horseshoe is more complicated than nailing. This is partly due to the fact that you have to weld the glue-on tabs to the horseshoe before you can apply it to the hoof. This has to be done very carefully and is therefore quite time-consuming; also, the result may vary depending on the surrounding conditions.
The preparations for the welding process are particularly complex and often depend on various external factors. It can, for example, be difficult to find a fitting work surface with sufficient light and protection from the weather.
Our answer to these difficulties is the Duplo Welding Device. It helps positioning the horseshoe and the glue-on tabs and makes sure that they are always welded at the same angle and at the same distance from the hot-air gun. That way, even for untrained users, it is easier to achieve a uniform welding seam – which, in turn, contributes to the durability of the glue-on shoe.
For further information have a look at our video and the assembly instruction.
Due to the positive feedback we have received from you, the welding device will change to our regular assortment on 01.01.2022.
NEW! The Mini - Version
The mini version of our popular welding device is aimed at all those who are looking for a budget-priced (but equally efficient) basis for uniform welding seams. It offers the same functionality as our existing de-vice but not the comfortable option of combining it with anvil or hoof stand without manual adjustments.

Glue-On Shoeing Step by Step
Whether from necessity or from conviction: During the past months, we have noticed that more customers than before chose glue instead of nails.
Take a look at our following instruction to learn more about the necessary elements of a successful glue-on horseshoe!


Adjusting the Duplo Horseshoe
After having chosen a fitting horseshoe, you adjust it to the hoof by means of an angle grinder or a belt grinder. If you are using a Duplo Basic model, please don’t forget to smoothen the quarter clips in order to avoid injuries.
We generally recommend removing all knobs before glueing in order to achieve better form closure.
When the horseshoe is perfectly adjusted to the hoof, you can start welding.

If you are using the glue-on tabs “Wolf Busch”, please make sure that the hot-air gun doesn’t radiate heat towards the inner layer of the tabs. The risk of this happening is minimized when using our welding device.
Deliberately mark the starting and terminal point by a bit more pressure. There should be a small glassy ridge visible along the complete welded edge.
When you are done welding, check the fit on the hoof and slightly round off the welded edges towards the bottom side.
Welding
Mark the correct positions of the glue-on tabs on the horseshoe. In case of the glue-on tabs “Wolf Busch”, the smallest tab points towards the heels.
Slightly preheat the initial welding area until the synthetic material starts glistening.
Make sure that the tabs don't reach the profiled area of the horseshoe and that they don't exceed the bottom edge of the horseshoe. If you are using our welding device, this is made sure by a fitting distance piece.
Whether you horizontally turn the horseshoe by means of our welding device or you vertically roll it over another surface in order to weld it to the glue-on tabs: Make sure you move it slowly but steadily in order to get a uniform welding seam.
Here’s the big advantage of our welding device: both your hands are free to concentrate on the welding process.

Preparations for Glueing
Roughen the hoof wall with abrasive paper before you start glueing.
Degrease the hoof wall below the coronet and the inner side of the glue-on tabs. We recommend spraying the roughened hoof wall with Multifoam and letting the foam react for about 30 seconds.
Afterwards, wipe everything thoroughly off and wait until the hoof is completely dry before glueing. Alternatively, you can use isopropanol of 99%. We do not recommend using acetone (e.g. break cleaner fluid).


Recommendations for Glueing
Depending on the temperature, we recommend different glues: the summer glue in case of temperatures above 10°C (50°F), otherwise the winter glue.
Sometimes, the weather isn’t that predictable. We are sometimes asked whether it’s possible to use the winter glue even if it’s “a little bit” warmer. We haven’t had any bad feedback for this situation! However, the summer glue isn’t as reliable in case of temperatures lower than 5°C (40°F) and the durability of the glued connection cannot be guaranteed.
Take notice of the final strength of the glue (about 24h in case of our recommended glues).
If the glue is left open for too long, it will start hardening due to the air moisture and won't be as reliable as usual.

Glueing
Wear gloves and respect the safety information for the glue you use.
Make another person lift the horse's opposing hoof so the horse will keep still.
Glue each tab individually. Strut the tab apart from the hoof wall and apply glue around the edge. Add a cross and four dots.
Evenly apply pressure to the tab with two fingers, starting from the bottom, for about 10-15 seconds.
In case of the glue-on tabs “Wolf Busch”: When at least three tabs are glued on (two on one side, one on the other), the horseshoe is well enough fixated on the hoof even if the horse moves.
In case of the glue-on tabs “Easy” and “Pro”, we recommend first glueing the two tabs in the very back of the inner and outer side of the hoof.

When all tabs are glued on, seal their edges with some glue.

Removing the Glue-on Horseshoe
We recommend shoe pullers and hoof/nail nippers for removing the glue-on tabs. Grab the top part of the tab with the pincers and simply pull the tab from the hoof.
Of course, you can also use a hoof knife and carefully cut between hoof and tab, starting from the top. Or you can rasp the tabs off (which is, however, probably the most time-consuming method).